The process of setting up a website is easier than ever…
With the introduction of new technologies, mainly content management systems, and detailed tutorials on the topic, such as this one.
Let’s get down to the details …
Part 1: Get a Domain Name

There are many different web registrars on the web but I, personally, recommend Bluehost because they’re super easy to use and will throw in a free domain if you get their web hosting. However, you can certainly use GoDaddy, NameCheap, Register.com, or your personal preference when purchasing from domain name providers.
When choosing a domain name, pay attention to the following:
- Does it have branding potential?
- Will people easily remember it?
- Does it explain what the website represents?
Recent Google updates have given a slap to keyword specific domain names which were very valuable in the past but since we’re moving on – I recommend you find a domain name that’s catchy and has the potential for growth down the line (so you don’t corner yourself).
Let’s get things going with the domain name
Visit Bluehost and try out a variety of domain names for your website.
If you’re stumped on names than use your niche research and the Google Adwords tool to kick around some ideas using your keywords. Don’t settle on a keyword specific domain (existing domains that survived the Penguin and Panda updates have already built authority but newer keyword domain names are going to have some trouble); just keep in mind what people may be searching when looking for your keywords.
For example: An e-commerce project selling bikes could be CyclingRack.com instead of BicyclesForSale.com.
Once you landed the name – continue with the purchase. For a discount, do a search for your “domain registrar” + “coupon” where you can often find a few discounts for checkout.
In all, you’ll only spend about $8 – $12 for your domain name, each year – a very small investment.
Part 2: Get the Web Hosting
The second element of setting up your website is getting your files hosted.
A web host is where all of your files are stored whereas the domain name points to this server which then serves the files to the visitor.
Don’t get too deep into this – just understand that having a web host that isn’t hosted by your domain registrar will ensure fault tolerance in case the network goes down (think: not keeping your eggs in one basket).
I prefer either HostGator or Bluehost for most projects. But, as I’ve said, you can purchase plans from any number of web hosting companies of your preference – ask your business network for their recommendations or dig around for reviews.

I recommend starting with the “Baby” plan if you’re going with HostGator (or prim plan on Bluehost) because it will allow you to add additional domain names, have domain privacy, and comes with a lot of nice features and flexibility when you’re growing the site. These are all very important if you plan on creating multiple sites.
Your total investment in web hosting will only be between $7 – $15 a month.
Part 3: Linking Domain to the Hosting
After you’ve received confirmation emails from the domain registrar and web hosting – you’ll need to link the two together – this involves pointing the domain name DNS to your web hosting.
The process is actually easy and once you get the hang of it, you’ll be able to do this in just a few minutes whenever you set up a new site.
To begin, log into your domain registrar account and web hosting ‘CPanel’ account.
In GoDaddy, you will ‘launch’ the domains options so you can view the domain names on your account.
- Once you’re in the domains section, navigate to the domain you’ve purchased and open the Set Nameservers within the options.
- Jump back to your web hosting cpanel and find the account information which displays the web hosting name servers.
- Copy and paste the name servers, from your web hosting, into the domain name server fields.
- Hit okay and your domain name is now linked to your web hosting.
The next part of linking the two is setting up the new domain within your web hosting.
Within the web hosting cpanel, find and open the Addon Domains.
Type in the domain name and generate a password – this adds your domain name to your server which will be used to install your server/website files.
Bluehost (as an alternative)
Those deciding to go with Bluehost won’t have to deal with half the trouble. If you purchase their web hosting and get the free domain — Bluehost will set up a basic WordPress installation for you. If you don’t like it, then you can delete the site and begin fresh.
Otherwise, the process is about the same with forwarding the DNS from domain to hosting providers.
Now we’re getting to the visual, meaty stuff …
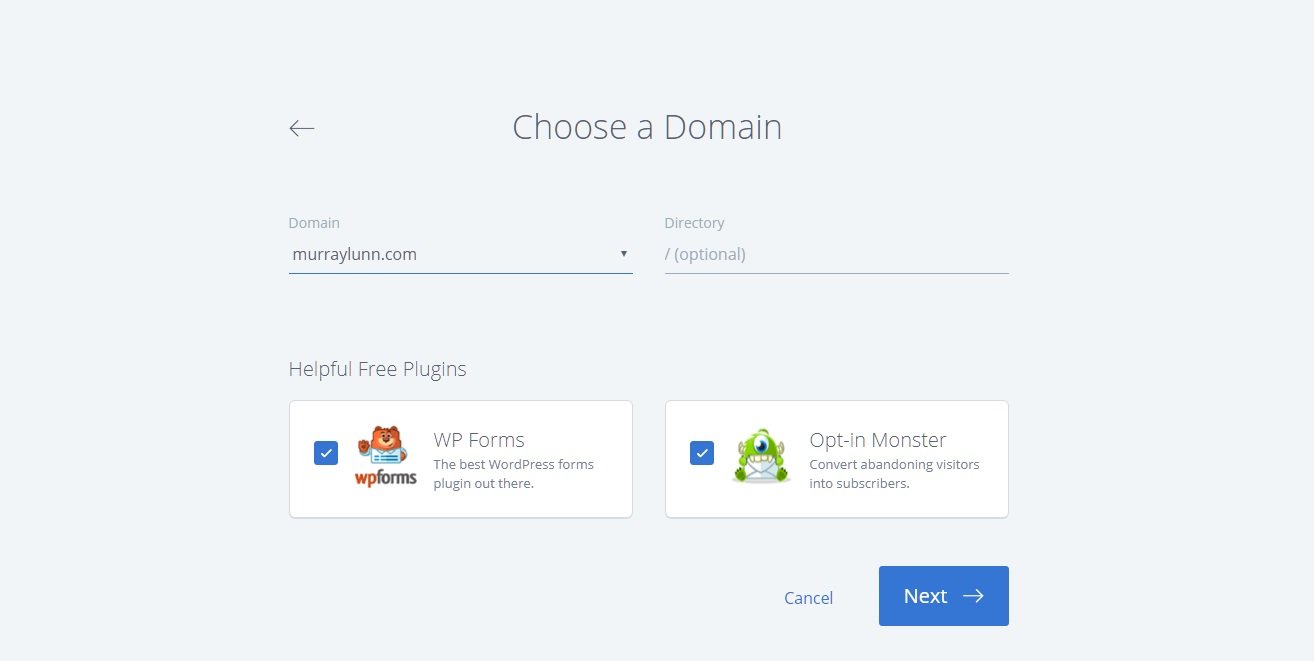
Part 4: Installing WordPress
WordPress is an incredibly flexible content management system that comes packed with great features, the ability to add themes and plugins, and allows you to edit and publish content without needing to know a ton of HTML/CSS and other web programming languages – its very user-friendly.
Setting up WordPress on your new domain and server is easily done through the Fantastico script.
Want to watch how it’s done? Check out…
Otherwise, follow these steps…
Click on the Fantastico link (usually a smiley face) within your web hosting.
You’ll now be on a panel which gives you multiple options for what you can install on your domain and server but go ahead and select ‘Wordpress’ from the sidebar.
- Select New Installation.
- Place in all the relevant data into the fields and follow the screen prompts to complete the WordPress installation on your server.
- If everything goes right, it will tell you the username, password, and the login link
Awesome! You’ve just set up your website – now it’s time to configure it, add a cool theme, and get this show on the road …
Part 5: Configuring the Website
Take an hour or two to dig around the WordPress backend; there are great tutorials on navigating the backend which you can find online – I say to do this because you’ll be working a lot in this area so it’s best to get used to it now than scrambling later.
There are a few things you want to do once you’ve set up your new WordPress installation:
- Set the permalinks within the Settings -> Permalinks to the “post name” option
- Install a few essential plugins within the Plugin -> Add New sidebar option
- Brainstorm and set your categories within Posts -> Categories option
- Setup your basic menu in the Appearance -> Menus area
The big part of what determines how the site is setup greatly depends on your WordPress theme.
A theme can come packed with a ton of features which means you shouldn’t do too much modification to the base installation until you’ve landed on the theme you want.
There are free and paid themes around the web.
To get you started, have a look at some of our resources:
- WordPress Themes: What do they do?
- Best WP themes for affiliate marketers
- Our WooThemes review
Beginners can find excellent themes from Elegant Themes which continually introduce fresh, flexible themes which match just about any and every type of website design you need. Though, you’re not limited to WooThemes as you can do searches for themes on the web, browse the ThemeForest marketplace, or pay for a unique design through a WordPress developer.
- Whatever your choice, navigate to the Appearance -> Themes options in the dashboard and select Upload from the list where you can navigate, select, and upload the WP theme you’ve purchased or downloaded freely.
- Go back to your theme options and click Activate on the new theme and boom – your site instantly takes on the look and feel of the theme you’ve purchased.
Note: You may need to go back in, at this point, to configure widgets and menus depending on the theme you’ve purchased.
Now you need to setup …
Part 6: The Essential Web Pages

Every website you set up may take on a different niche, design, and focus but every site will generally have a few essential pages, such as:
- About Me
- Contact
- Privacy Policy
- Archives
- Disclosure
You can create these pages within the Pages -> Add New options within the WordPress sidebar.
- Craft the about me page so it’s very personal and gives a story
- Utilize plugins like Contact Form 7 (or a built-in theme option) for the contact page
- Use a privacy policy or terms of service generator to ensure you’re playing by the rules
- Use an archive plugin to create a page that dynamically updates your archives
- Add an affiliate disclosure page
These pages will come together quite rapidly but don’t forget them!
Upon completion of these, some basic setup, you’re now ready to begin creating content for your new website.
That’s All for the Website Setup Guide… But There’s Still More to Do!
This website setup guide may be intimidating but follow along and you’ll be up in about an hour or less.
A small investment of about $20 – $30 up-front will have you ready to begin building an online, affiliate business in a single afternoon – so there’s no reason not to have a website at this point.
If you enjoyed the series so far – please share it – comment – and keep at it because there’s a lot more to learn so stick with me because, by the end of it, you’re going to find success.